Wednesday, April 29, 2015

Retreive ALL Service Accounts and Passwords via PowerShell

I wanted to share a script I came across that will hopefully help many others out there in the future. I recently inherited a SharePoint/Project Server environment that no one in the organization had the credentials for the Farm or any service accounts.
Not only did I find out no one had any credentials but I also found out they used the same credentials for multiple environments. This left me with the task of having to reset the password on all of the servers, services, AD, etc. but would also cause a larger outage due to cross environment use.
So through some research I found this cool little script to help me out. This will go to the secure store databases and retrieve the Farm account information and then use it to retrieve the others.

#------------------------------------------------------------------------------------------
# Name: Recover-SPManagedAccounts
# Description: This script will retrieve the Farm Account credentials and show the
# passwords for all of the SharePoint Managed Accounts
# Usage: Run the script on a SP Server with an account that has Local Admin Rights
#------------------------------------------------------------------------------------------

#Checks if the Current PowerShell Session is running as the Administrator

if(([Security.Principal.WindowsPrincipal] [Security.Principal.WindowsIdentity]::GetCurrent()).IsInRole([Security.Principal.WindowsBuiltInRole] "Administrator") -eq $false){
Throw "This Script must be ran as Administrator"
}

#This section retrives the Farm Account UserName/Password from the Security Token Service Application Pool

$Farm_user = C:\Windows\System32\cmd.exe /q /c $env:windir\system32\inetsrv\appcmd.exe list apppool "SecurityTokenServiceApplicationPool" /text:ProcessModel.UserName;
$Farm_pass = C:\Windows\System32\cmd.exe /q /c $env:windir\system32\inetsrv\appcmd.exe list apppool "SecurityTokenServiceApplicationPool" /text:ProcessModel.Password;
$Credential = New-Object System.Management.Automation.PsCredential($Farm_user, (ConvertTo-SecureString $Farm_pass -AsPlainText -Force));

# This line contains the script which returns the account passwords 

$GetManagedAccountPasswords = "
Add-PSSnapin Microsoft.SharePoint.PowerShell -EA 0;
function Bindings(){
return [System.Reflection.BindingFlags]::CreateInstance -bor
[System.Reflection.BindingFlags]::GetField -bor
[System.Reflection.BindingFlags]::Instance -bor
[System.Reflection.BindingFlags]::NonPublic;
}
function GetFieldValue([object]`$o, [string]`$fieldName){
`$bindings = Bindings;
return `$o.GetType().GetField(`$fieldName, `$bindings).GetValue(`$o);
}
function ConvertTo-UnsecureString([System.Security.SecureString]`$string){
`$intptr = [System.IntPtr]::Zero;
`$unmanagedString = [System.Runtime.InteropServices.Marshal]::SecureStringToGlobalAllocUnicode(`$string);
`$unsecureString = [System.Runtime.InteropServices.Marshal]::PtrToStringUni(`$unmanagedString);
[System.Runtime.InteropServices.Marshal]::ZeroFreeGlobalAllocUnicode(`$unmanagedString);
return `$unsecureString;
}

Get-SPManagedAccount | select UserName, @{Name='Password'; Expression={ConvertTo-UnsecureString (GetFieldValue `$_ 'm_Password').SecureStringValue}}";

#Writes the Script to the Public Folder (C:\Users\Public), this is required as we cant run the script inline as its too long.

Set-Content -Path "$($env:public.TrimEnd("\"))\GetManagedAccountPasswords" -Value $GetManagedAccountPasswords;

#The Script which will be ran in the new PowerShell Window running as the Farm Account, it also removes the script above which we wrote to the file system

$Script = "
`$Script = Get-Content `"$($env:public.TrimEnd("\"))\GetManagedAccountPasswords`";

PowerShell.exe -Command `$Script;
Remove-Item `"$($env:public.TrimEnd("\"))\GetManagedAccountPasswords`";
Add-PSSnapin Microsoft.SharePoint.PowerShell -EA 0;"

#Runs PowerShell as the Farm Account and loads the Script above

Start-Process -FilePath powershell.exe -Credential $Credential -ArgumentList "-noexit -command $Script" -WorkingDirectory C:\

Distributed Cache (repairing it with PowerShell)

* Recently we had issues with our distributed cache system that was set up on are farm quite some time ago when I built it with SPAuto-Installer.  This could have been from rolling out cumulative updates or what have you.  There is very little documentation on the web for this.

*  In our case we had 4 servers (2 web front-ends and 2 application servers)  all with the distributed cache enabled.  Only one server was running the distributed cache.

*  The correct topology for distributed cache is for it to exist on the web front-ends.  So we made some changes to the farm. 

Clean up all 4 Servers using the following commands:

#Stopping the service on local host
Stop-SPDistributedCacheServiceInstance -Graceful

#Removing the service from SharePoint on local host.
Remove-SPDistributedCacheServiceInstance

#Cleanup left over pieces from SharePoint
$instanceName =”SPDistributedCacheService Name=AppFabricCachingService”
$serviceInstance = Get-SPServiceInstance | ? {($_.service.tostring()) -eq $instanceName -and ($_.server.name) -eq $env:computername}
$serviceInstance.delete()


Then we added the cache host back to WEB01:

#Re-add the server back to the cluster
Add-SPDistributedCacheServiceInstance

We then checked the SPDistributedCacheClientSettings and found that "MaxConnectionsToServer" was set to 16 for all containers.

$DLTC = Get-SPDistributedCacheClientSetting -ContainerType DistributedLogonTokenCache
$DLTC

We used the following script to change  "MaxConnectionsToServer" back to 1 and increase the timeout for each container.

Add-PSSnapin Microsoft.Sharepoint.Powershell

#DistributedLogonTokenCache
$DLTC = Get-SPDistributedCacheClientSetting -ContainerType DistributedLogonTokenCache
$DLTC.MaxConnectionsToServer = 1
$DLTC.requestTimeout = "3000"
$DLTC.channelOpenTimeOut = "3000"
Set-SPDistributedCacheClientSetting -ContainerType DistributedLogonTokenCache -DistributedCacheClientSettings $DLTC

#DistributedViewStateCache
$DVSC = Get-SPDistributedCacheClientSetting -ContainerType DistributedViewStateCache
$DVSC.MaxConnectionsToServer = 1
$DVSC.requestTimeout = "3000"
$DLTC.channelOpenTimeOut = "3000"
Set-SPDistributedCacheClientSetting -ContainerType DistributedViewStateCache $DVSC

#DistributedAccessCache
$DAC = Get-SPDistributedCacheClientSetting -ContainerType DistributedAccessCache
$DAC.MaxConnectionsToServer = 1
$DAC.requestTimeout = "3000"
$DAC.channelOpenTimeOut = "3000"
Set-SPDistributedCacheClientSetting -ContainerType DistributedAccessCache $DAC

#DistributedAccessCache
$DAF = Get-SPDistributedCacheClientSetting -ContainerType DistributedAccessCache
$DAF.MaxConnectionsToServer = 1
$DAF.requestTimeout = "3000"
$DAF.channelOpenTimeOut = "3000"
Set-SPDistributedCacheClientSetting -ContainerType DistributedActivityFeedCache $DAF

#DistributedActivityFeedLMTCache
$DAFC = Get-SPDistributedCacheClientSetting -ContainerType DistributedActivityFeedLMTCache
$DAFC.MaxConnectionsToServer = 1
$DAFC.requestTimeout = "3000"
$DAFC.channelOpenTimeOut = "3000"
Set-SPDistributedCacheClientSetting -ContainerType DistributedActivityFeedLMTCache $DAFC

#DistributedBouncerCache
$DBC = Get-SPDistributedCacheClientSetting -ContainerType DistributedBouncerCache
$DBC.MaxConnectionsToServer = 1
$DBC.requestTimeout = "3000"
$DBC.channelOpenTimeOut = "3000"
Set-SPDistributedCacheClientSetting -ContainerType DistributedBouncerCache $DBC

#DistributedDefaultCache
$DDC = Get-SPDistributedCacheClientSetting -ContainerType DistributedDefaultCache
$DDC.MaxConnectionsToServer = 1
$DDC.requestTimeout = "3000"
$DDC.channelOpenTimeOut = "3000"
Set-SPDistributedCacheClientSetting -ContainerType DistributedDefaultCache $DDC

#DistributedSearchCache
$DSC = Get-SPDistributedCacheClientSetting -ContainerType DistributedSearchCache
$DSC.MaxConnectionsToServer = 1
$DSC.requestTimeout = "3000"
$DSC.channelOpenTimeOut = "3000"
Set-SPDistributedCacheClientSetting -ContainerType DistributedSearchCache $DSC

#DistributedSecurityTrimmingCache
$DTC = Get-SPDistributedCacheClientSetting -ContainerType DistributedSecurityTrimmingCache
$DTC.MaxConnectionsToServer = 1
$DTC.requestTimeout = "3000"
$DTC.channelOpenTimeOut = "3000"
Set-SPDistributedCacheClientSetting -ContainerType DistributedSecurityTrimmingCache $DTC

#DistributedServerToAppServerAccessTokenCache
$DSTAC = Get-SPDistributedCacheClientSetting -ContainerType DistributedServerToAppServerAccessTokenCache
$DSTAC.MaxConnectionsToServer = 1
$DSTAC.requestTimeout = "3000"
$DSTAC.channelOpenTimeOut = "3000"
Set-SPDistributedCacheClientSetting -ContainerType DistributedServerToAppServerAccessTokenCache $DSTAC 

- We then stopped and restarted Distributed Cache from Central Admin on WEB01

- We then attempted to start "Distributed Cache" on WEB02 and received error "failed to connect to hosts in the cluster"

- Performing a TRACERT from WEB01 to WEB02, we can see a device is in the middle (10.21.1.5).

- Installed Telnet

Import-Module servermanager
Add-WindowsFeature telnet-client


- Telnet from WEB01 to WEB02 on port 22233 and the connection was established.

- We then stopped, cleaned and added WEB02 back to the cache farm

#Stopping the service on local host
Stop-SPDistributedCacheServiceInstance -Graceful

#Removing the service from SharePoint on local host.
Remove-SPDistributedCacheServiceInstance

#Cleanup left over pieces from SharePoint
$instanceName =”SPDistributedCacheService Name=AppFabricCachingService”
$serviceInstance = Get-SPServiceInstance | ? {($_.service.tostring()) -eq $instanceName -and ($_.server.name) -eq $env:computername}
$serviceInstance.delete()

Then we added the cache host back to WEB02:

#Re-add the server back to the cluster
Add-SPDistributedCacheServiceInstance

This time it started!

- Now we have WEB01 and WEB02 servicing distributed Cache

- We checked the ULS Logs with ULSViewer and found all successful events for Distributed Cache.
Status
=======
Distributed cache is now healthy and in a working state on both WFE Servers.

Friday, April 24, 2015

PowerShell script to change the local setting for all sites within a given Site collection

 PowerShell script to change the locale (regional settings) for each site in a given site collection, as by default the locale is set to en-US (United States).  It leverages the Get-SPWeb command to enumerate sub-sites.  Here is the script

# ======================================================
#
# SharePoint 2010 PowerShell script to change the locale
# setting for all sites within a given Site collection
#
# ======================================================

# -------------
# Set variables
# -------------

$Site = "http://intranet"
$NewLocale = "en-GB"

$Webs = Get-SPWeb -Site $Site

# ------------
# Begin script
# ------------

ForEach ($Web In $Webs)
{
   If ($Web.locale -ne $NewLocale)
   {
      Write-Host $Web.title "- " -NoNewLine; Write-Host "changing from" $Web.locale "to" $NewLocale -ForegroundColor "Green"
      $Web.Locale = $NewLocale
      $Web.Update()
      $Web.Dispose()
   }
   Else
   {
      Write-Host $Web.title "- " -NoNewLine; Write-Host "already set to" NewLocale -ForegroundColor "Blue"
   }

}

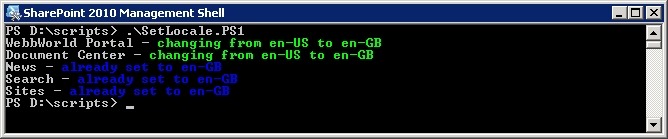
And here is a screenshot of the output, colour coded to make it easier to read:
Script_Output

POWERSHELL SCRIPT TO EXPORT ALL SITES IN A SITE COLLECTION TO A SEPERATE FILE

I have a requirement to export all sites with in site collection to a separate backup file.  With lots of sub-sites I thought the best way to do this would be with a PowerShell script that utilises the Export-SPWeb command.  So I wrote one!  Here is the script:
<#
 --------------------------------------------

 SharePoint 2010 PowerShell script to export
 all sites within a given Site Collection to
 a separate file.

 File        : ExportSites.PS1

 Revision history:
 -----------------
 1.0 Initial version

---------------------------------------------
 #>

 # -------------
 # Set variables
 # -------------

$SiteCollection = "http://intranet"
$sites = Get-SPWeb -Site $SiteCollection -Limit All
$ExportFolder = "D:\Exports\"

 # ------------
 # Begin export
 # ------------

ForEach ($site In $sites)
 {
$ExportFile = $ExportFolder + $site.Title + ".cmp"
 Write-Host "Exporting" $site.title "-" $site.url
 Export-SPWeb $site.url -Path $ExportFile -IncludeVersions All -IncludeUserSecurity -Force
 Write-Host "Export to" $ExportFile " complete.  File is" (Get-Item $ExportFile).length "bytes." -ForegroundColor "Green"
}

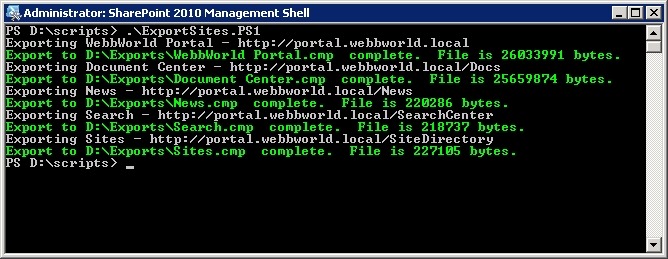
And here is a screenshot of the output, colour coded to make it easier to read:
Script_Output
Feel free to copy the code and use the script as you see fit (at your own risk of course, I can not and will not take responsibility for any undesired outcome).  You may wish to add additional parameters to the Export-SPWeb command such as UseSQLSnapshot, or NoLogFile

ENABLE FILESTREAM AND PROVISION A REMOTE BLOB STORE

Binary large objects, known as BLOBs, are used to store large binary data such as Office documents and media.  By default BLOBs are stored in the content database on the SQL server.  Today I am going to enable FILESTREAM on my SQL server and install a RBS provider on the SharePoint server to store large files directly on disk.  Why?  Primarily to increase performance but also to keep the size of the database at a manageable size.
Step 1 – Enable and configure FILESTREAM on the SQL server
1. Open SQL Server Configuration Manager
2. Click SQL Service Services
3. Right-click SQL Server (<instance>) and then click Properties
4. On the FILESTREAM tab tick the Enable FILESTREAM for Transact-SQL access, Enable FILESTREAM for file I/O streaming access, and Allow remote clients to have streaming access to FILESTREAM data.  Also enter a name for the shared folder and then click OK.
SQL_Server_Properties
5. Start SQL Server Management Studio and connect to the required instance
6. In the Object Explorer pane right-click the SQL server and click Properties
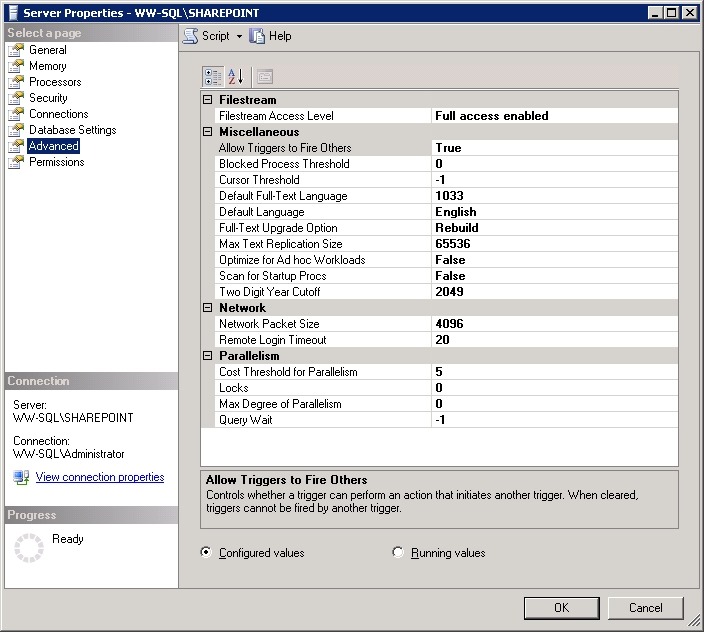
7. On the Advanced page set Filestream Access Level to Full access Enabled and then click OK
Server_Advanced_Properties
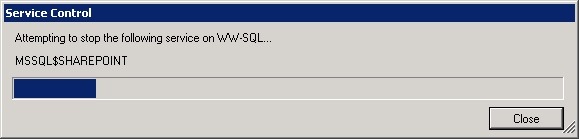
8. Right-click the server and click Restart.  Click Yes to confirm and wait while the service restarts.
Service_Control
9. In the Object Explorer pane select the desired SharePoint content database and click New Query
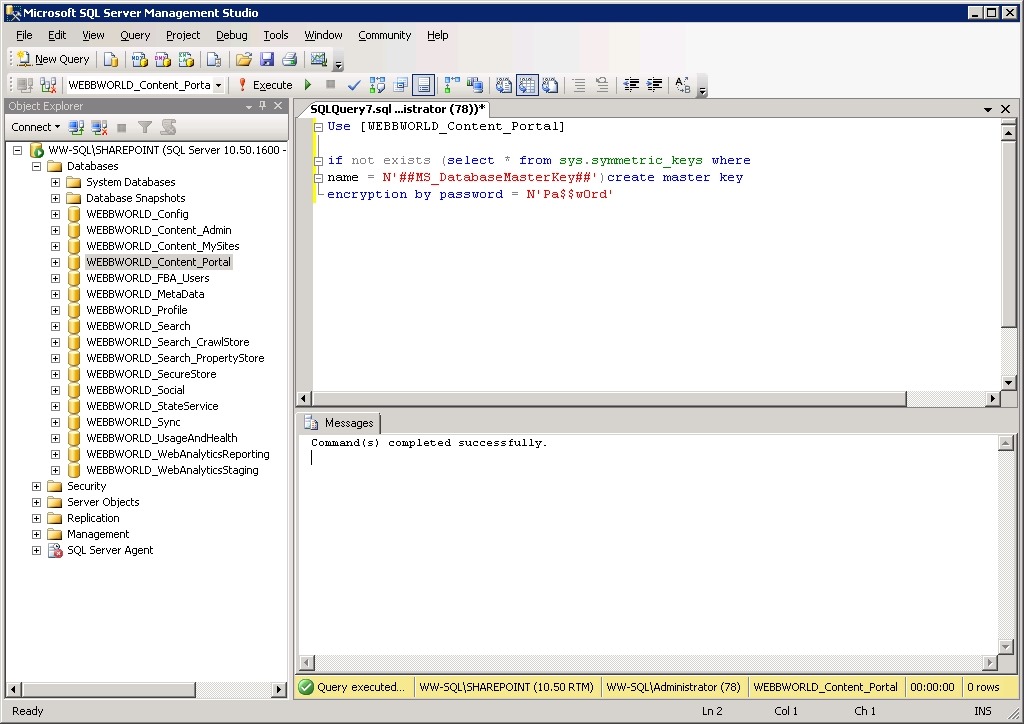
10. Execute the following query to provision a BLOB store, replacing the database name and password with your own:
Use [WEBBWORLD_Content_Portal]
if not exists (select * from sys.symmetric_keys where
name = N’##MS_DatabaseMasterKey##’)create master key
encryption by password = N’Pa$$w0rd’
Execute_Query
11. Click New Query
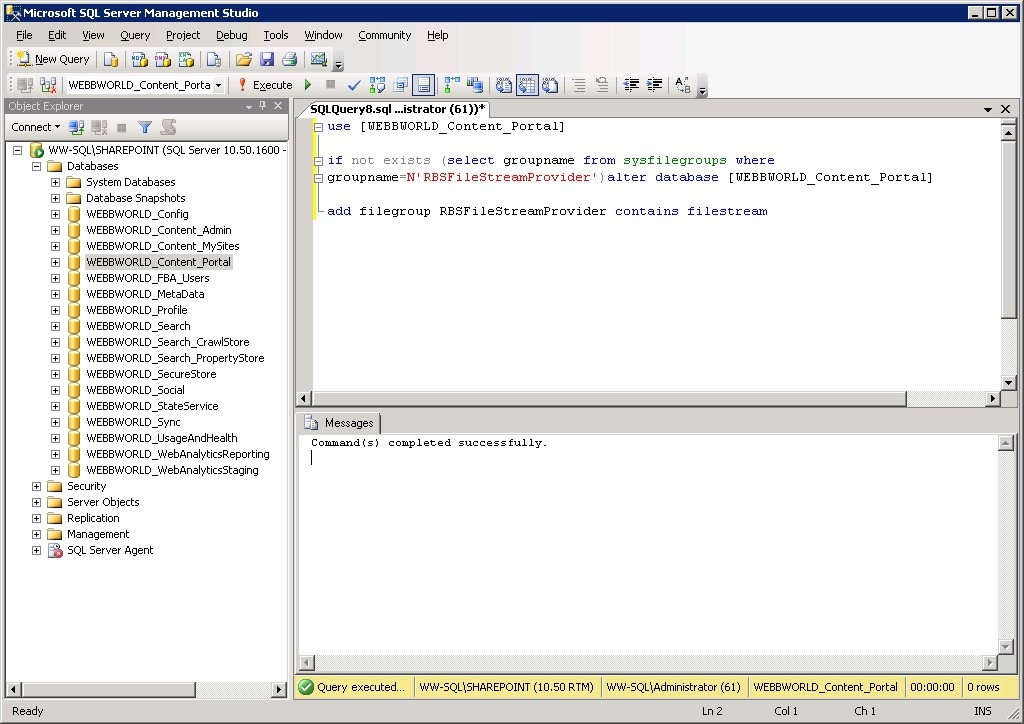
12. Execute the following query to enable a new filegroup, replacing the database name with your own:
use [WEBBWORLD_Content_Portal]
if not exists (select groupname from sysfilegroups where
groupname=N’RBSFileStreamProvider’)alter database [WEBBWORLD_Content_Portal]
add filegroup RBSFileStreamProvider contains filestream
Execute_Query_2
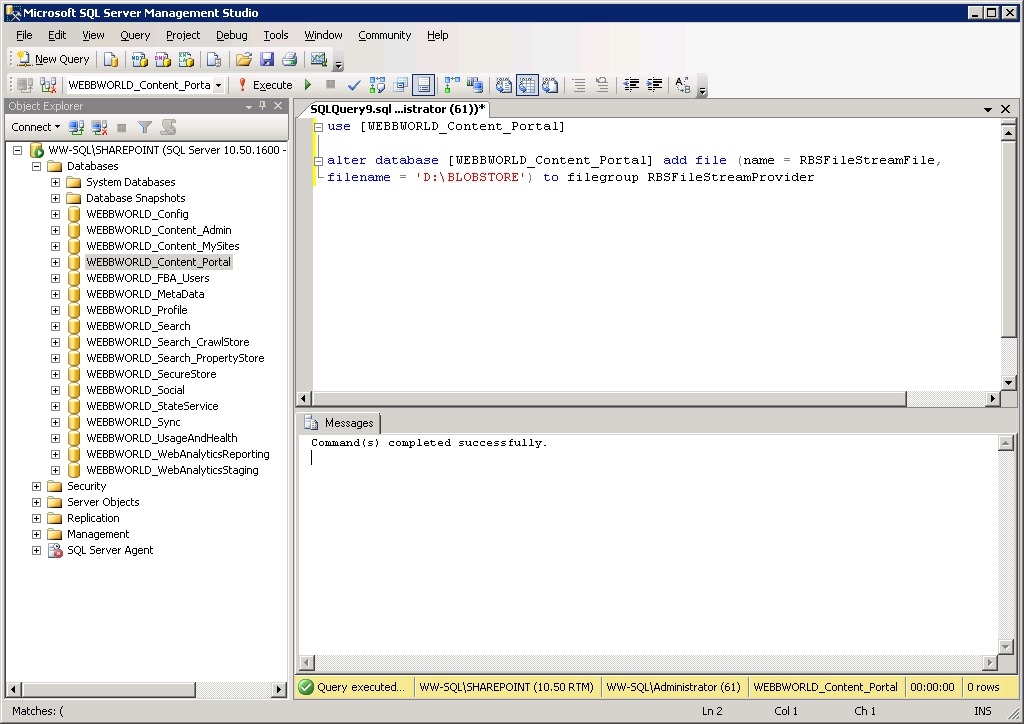
13. Execute the following query to create a file system mapping, replacing the database name and BLOB store path with your own:
use [WEBBWORLD_Content_Portal]
alter database [WEBBWORLD_Content_Portal] add file (name = RBSFileStreamFile,
filename = ‘D:\BLOBSTORE’) to filegroup RBSFileStreamProvider
Execute_Query_3
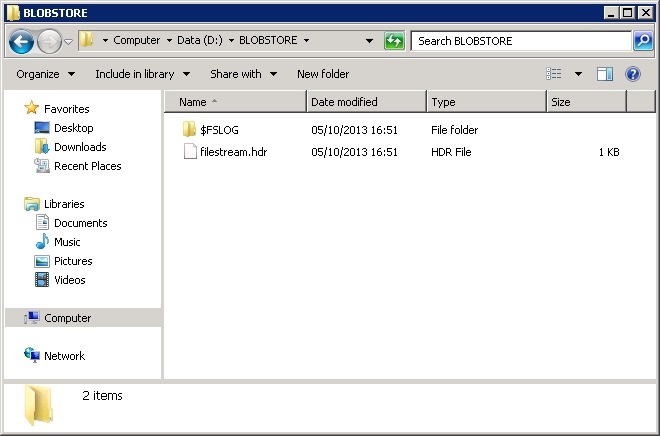
14. Use Windows Explorer to check that the folder has been created
BLOBSTORE

Step 2- Install RBS on the SharePoint server
1. Download RBS.msi from the SQL 2008 R2 Feature Pack
2. Run the following command to install the RBS provider, replacing the log file name, database name, instance and file stream store name with your own:
msiexec /qn /lvx* d:\rbslog.txt /i D:\RBS.msi TRUSTSERVERCERTIFICATE=true FILEGROUP=PRIMARY DBNAME="WEBBWORLD_Content_Portal" DBINSTANCE="WW-SQL\SHAREPOINT" FILESTREAMFILEGROUP=RBSFilestreamProvider FILESTREAMSTORENAME=SHAREPOINT
The installation may take a few minutes (there will be no status or message displayed) but you can check the log file to check when it has completed successfully.
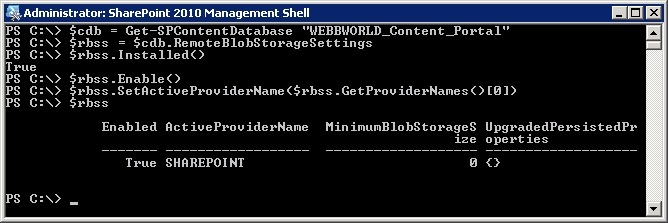
3. Execute the following PowerShell commands to enable RBS
$cdb = Get-SPContentDatabase “WEBBWORLD_Content_Portal”
$rbss = $cdb.RemoteBlobStorageSettings
$rbss.Installed()
$rbss.Enable()
$rbss.SetActiveProviderName($rbss.GetProviderNames()[0])
$rbss
PowerShell_1
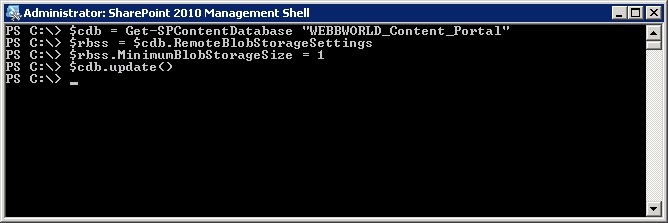
4. Execute the following PowerShell commands to configure the BLOB size threshold
$cdb = Get-SPContentDatabase “WEBBWORLD_Content_Portal”
$rbss = $cdb.RemoteBlobStorageSettings
$rbss.MinimumBlobStorageSize = 1048576
$cdb.update()
PowerShell_2
Now, transfer some large files (preferably above the specified threshold) into a document library and you should see them appear in the BLOB store.

CHANGE USER DISPLAY NAME USING POWERSHELL

I have recently extended a web application to enable Form Based Authentication.  After a few days I noticed that user display names are showing in the following format:
i:0#.f|webbworldfbamembershipprovider|dave@webbworld.local
I would prefer to see ”Firstname Surname” format.  I can use the Set-SPUser PowerShell command to change the display name.  Here is an example of how this works:
Set-SPUser “i:0#.f|webbworldfbamembershipprovider|dave@webbworld.local” -Web http://intranet -DisplayName “Dave Webb”
Now the display name is shown correctly.